Here this step by step to resetting waste ink counter printer Canon PIXMA iP 1880 permanent :
- Press Resume button hold for 1 - 2 minutes.
- Open the cover.
- Release the catridge and then put catridge again.
- Close The Cover.
- Turn Off.
- then Turn On again.
And use this tool for permanent resetting waste ink canon Pixma iP 1880.Download Service Tool Canon iP1880
Canon PG-40/CL-41/PG-50/CL-51/CL-52 Cartridges
To reset the ink meters (method 1) :
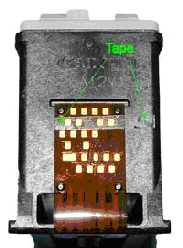
- Paste with a thin strip tape the upper horizontal row contactjesOut of the cartridge (Picture 1).
- Insert the cartridge into the printer and close the lid.
- The printer will now on the move, but wait until there on the screen Your computer is the message that there is a wrong way to a Ink cartridge is loaded. Click OK in the message.
- Open the lid of the printer and remove the cartridge from there.
- Download Now the strip of adhesive tape and paste it contact now on the Second row (from top) horizontal contactjes. (Picture 2)
- Insert the cartridge into the printer back again and closed the lid. Weather will The printer is on the move again, and again we place an alert on Your monitor. This time, the message that the cartridge can not Be recognized. Click on OK again.
- Open the printer and remove now for the last time the cartridge from thePrinter.
- Remove the tape and insert the cartridge in the printer and connect it Lid.
- The printer is the cartridge back as a new and indicates that the cartridge full again.
Resetting the ink meters (method 2) :
Works only in some cases
- Paste with a thin strip tape the bottom row of horizontal contact The cartridge off.
- Insert the cartridge into the printer and close the lid.
- The printer will now on the move, but wait until there on the screen Your computer is reported that on one wrong way Ink cartridge is loaded. Click OK in the message.
- Open the lid of the printer and remove the cartridge from there.
- Download Now the strip of adhesive tape and paste it contactjes now on the Contact uppermost horizontal row.
- Insert the cartridge into the printer back again and closed the lid. Weather will The printer is on the move again, and again we place an alert on Your monitor. This time, the message that the cartridge can not Be recognized. Click on OK again.
- Open the printer and remove now for the last time the cartridge from the Printer.
- Remove the tape and insert the cartridge in the printer and connect it Lid.
- The printer is the cartridge back as a new and indicates that the cartridge full again.
Canon PIXMA iP1700, iP1300
- Turn off printer.
- Hold down Resume button and press Power button.
- Keep holding down Power button and let Resume button go.
- Press Resume button 2 times then let both buttons go.
- Green lights will flash and then stop blinking.
- When green lights are solid, press the Resume button 4 times.
- Press the Power button and the printer should turn off, if not, press the Power button once more.
- Your printer should respond as normal.
Canon PIXMA iP1200, iP1600, iP2200
- Download software for Canon iP1200, iP1600, iP2200.DOWNLOAD Service Tool for Canon iP1200, iP1600, iP2200
- Unzip downloaded file by WinZip, 7Zip, Izarc, etc.
- Run GeneralTool.exe.
- Select the connected USB port number from USB PORT.
- Click LOCK RELEASE, and select the applicable model name in SET DESTINATION.
- In CLEAR WASTE INK COUNTER, select MAIN or PLATEN. The selected waste ink counter will be reset. MAIN resets the main waste ink counter, PLATEN resets the platen waste ink counter.If both the main and platen waste ink absorbers are replaced, reset both the main and platen waste ink counters.